Wednesday, July 18, 2018

Unable to access file since it is locked - An error occurred while consolidating disks: msg.fileio.lock.

This is an oldie but a goodie.  

I was recently asked by the backup team to look into an error they were seeing in NetBackup.  The error was that NetBackup was unable to consolidate a virtual machine's disks.


Just right click on the VM --> Snapshot --> Consolidate.  Done!  Not so fast, this time I received the following error:

An error occurred while consolidating disks: msg.fileio.lock.


Unfortunately,  the usual create/delete snapshot and vMotion of VM did not work.

To resolve this issue perform the following:

1. SSH or Console into the ESXi host.
2. View the vmware.log file of the offending VM and look for the locked file:

ex.  /vmfs/volumes/offendingVM/offendingVM-dir/vmware.log 


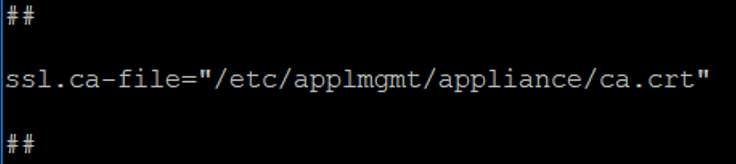
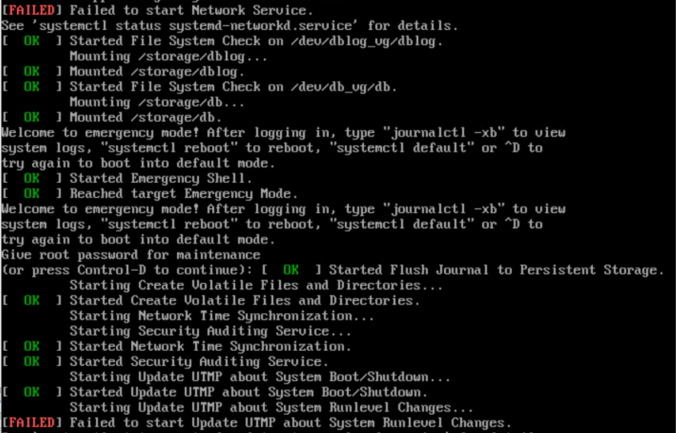
3. Run the vmkfstools -D command against the locked .vmdk to determine the MAC address of the ESXi host which has the lock.  The MAC address of the ESXi host which has locked the file is circled in RED.


4. Log into the vCenter server using you're favorite client, then look for the ESXi host which has the NIC matching the MAC above.

5. Place the host locking the vmdk in Maintenance Mode.  Then restart the hostd service:

/etc/init.d/hostd restart


6.  Exit Maintenance Mode.  I was then able to successfully perform the Consolidate function.  As an additional test, I created and deleted a test snapshot.

Tuesday, July 10, 2018

VMware vCSA VAMI :5480 - Certificate Error - Not Secure - You cannot visit right now because the website uses HSTS.

I recently replaced the self signed cert on our vCSA with one generated from a proper CA server.  The Web Client and vSphere (HTML5) client showed the nice green Secure padlock.

However, when I tried to access the VMware Appliance Management Interface (VAMI), I received a Not Secure prompt.  I was unable to proceed to the site. 


Advanced details showed the following;


MyServer.MyDomain.com normally uses encryption to protect your information. When Google Chrome tried to connect to MyServer.MyDomain.com this time, the website sent back unusual and incorrect credentials. This may happen when an attacker is trying to pretend to be MyServer.MyDomain.com, or a Wi-Fi sign-in screen has interrupted the connection. Your information is still secure because Google Chrome stopped the connection before any data was exchanged.
You cannot visit MyServer.MyDomain.com right now because the website uses HSTS. Network errors and attacks are usually temporary, so this page will probably work later.

Well, there appears to be a bug where with the VMware vCSA 6.X.  After applying a new vCSA certificate, the VMWare Appliance Management Interface (VAMI) does not display the new certificate.

To resolve this issue for a vCSA running 6.5,  perform the following:

1. Copy the CA cert to the following directory : /etc/applmgmt/appliance/ca.crt

By default, the ca.crt file does not exist in this directory.  FYI, Applmgmt is the VMware Appliance Management Service.


2. Using VI, open the following file: /opt/vmware/etc/lighttpd/lighttpd.conf

3. Add the following line to the file: 
ssl.ca-file="/etc/applmgmt/appliance/ca.crt"


3. Restart the VAMI Service by running: /etc/init.d/vami-lighttp restart


Enjoy the nice Green Secure lock! 

Friday, June 15, 2018

Ecoboost Mustang - How to Prevent an Ecoboom - Lowside Fuel Pressure Sensor Replacement

**Update - July 19th 2018** In one of the forums, a member experienced an EcoBoom after installing the revised sensor.  This may not be the end all, be all answer.  However, I'm still glad to have ungraded it as a precautionary measure. 

Adam Brunson had posted on social media that he had several customers with Low Side Fuel Pressure Sensor Failures.  This caused a lean condition leading to a catastrophic failure of the motor (EcoBoom).  Apparently, there is no warning or fault code thrown when the sensor fails...

As a preventative measure, I replaced the sensor.   The sensor was $23.58 from Tasca Parts and only takes 10-15 minutes to replace.  Fortunately, the sensor is easily accessible at the top/rear of the engine compartment.

The item ordered was BU5Z-9F972-B.  However, the actual part number on the sensor is BU5A-9F972-CA. (New sensor on bottom).   According to some posts, the 2018 Mustangs still have the old sensor.

It appears the part has been revised by Ford.  The revised sensor has an additional hole for atmospheric pressure.

***Perform the following fix at your own risk.  You are working with fuel.  I am not responsible for any damage or injury while performing the steps below***

I let the car sit overnight prior to replacing the sensor.  You will need a 12mm and 24mm wrench to perform this job.  Press the tab marked in red and removed the sensor. 

Place a rag under the sensor and use the 12mm and 24mm wrench to remove the sensor.  Use extreme care when handling the metal on the fuel line.  It appears to be soft.  Since the fuel line is under pressure, remove the sensor SLOWLY.  I had a slight "mist" of gas emitted when removing the sensor.

Replace the sensor and reattached the connector.  Wipe up any gas that may have spilled.  Start up the car to confirm there are no leaks.  I used a mirror to view the back side.

It may be a placebo effect, but I seem to have a smoother idle and acceleration after the swap.  Hope this helps!

Additional precautions I have taken to prevent the dreaded EcoBOOM:

Replace your Evap Purge Valve with part number FR3Z-9G297-H.

UPR catch can installed.
Only top tier gas of the highest octane used.
I change my oil when the maintenance minder is at 55% and 10% with synthetic motor oil. 
I do not accelerate aggressively in 5th and 6th gear at low RPMs.   Low Speed Pre-Ignition (LSPI)

Wednesday, May 16, 2018

VMWare vCSA 6 - Failed to start File System Check on /dev/dis...

AKA - The vCSA is FRAGILE...

Errors encountered during this process:
Failed to start File System Check on /dev/dis...
Failed to start update UTMP about System RunLevel Changes.
Failed to start Network Service.

We recently had a quick "blip" on one of our storage arrays.   All the Windows Servers had no disruption of service or came back up without incident.

This was not the case with our vCSA and external PSC.  BOTH servers were not functional.   So, it doesn't appear to be a one-off or fluke.  The appliances were running version 6.5.0.15000, the March 2018 release.

Both servers showed "Detected aborted journal"  and "journal has aborted" errors on the console.  I started trouble shooting with the external PSC.

Upon restart, I received the following error, and the server entered Emergency Mode:

Failed to start File System Check on /dev/dis...


Log in and run the following commands to determine the device which is causing the error (Both were /dev/sda3 in my case):

/bin/sh
/bin/mount
blkid


Match the UUID in the error message with the PARTUUID in the output.  In the example below, we see it matches up with /dev/sda3.


Run the following command which runs a check on ext2, 3 and 4 File Systems. "-y" answers "yes" to all the questions. (Super handy)

e2fsck -y /dev/sda3


After the file system check has completed, restart the appliance.

This resolved the issue with the the external PSC.  Cool, just repeat the process on the vCSA right?  Not so fast....

I had the following additional errors with the vCSA after running the file check on /dev/sda3.

Failed to start update UTMP about System RunLevel Changes.
Failed to start Network Service.


Running the following command to view the contents of the systemd journal.  This pointed me to log_vg-log

journalctl -xb


Run a file system check against log_vg-log by running the following:

fsck -y /dev/mapper/log_vg-log


Reboot the server after the fsck has completed.  After coming back up, the vCenter services started successfully and I was able to log into the vCSA.

Tuesday, May 15, 2018

Deploy OVF Template - The following manifest file entry (line 1) is invalid: SHA256

AKA - Another reason to stop using the vSphere C# Client....

I created an OVF template from my vSphere 6.5 environment.  When trying to import the template using the vSphere C# Client, I received the following error:

The following manifest file entry (line 1) is invalid: SHA256


vSphere 6.5 started using SHA256 as the default hashing algorithm when exporting OVF templates.  Unfortunately, the vSphere Fat/C# Client only supports SHA1.

There a several ways to resolve this issue:
Option 1- Use the Web or HTML 5 client to import the OVF.  Both support SHA256.

Option 2. Use the OVFTool to convert the Cryptographic Hash Algorithm from SHA256 to SHA1.  This free tool can be downloaded here:
https://www.vmware.com/support/developer/ovf/

Option 3. (Not recommended) If you trust the source of the OVA, you can delete the optional .mf file (manifest file) and just use the .ovf and .vmdk files to import the VM..  The .mf file contains the SHA256 info


ESXi 6 - How to Unlock Your SSH Account.

ESXi Account lockout info:
1.  Accounts are locked after 10 failed attempts through SSH and the vSphere Web Services SDK.
2. The Direct Console Interface (DCUI) and ESXi shell do not support the account lockout feature.
3. The account automatically unlocks after 120 seconds by default.
4. ESXi leverages the Linux Pluggable Authentication Modules (PAM)

If you are unable to wait for the account to unlock, you can reset the account by doing the following:
1. Console into your server by using your DRAC/iLO/UCS Manager etc.
2. log in as root, and run the following command to unlock the account.  In the example below, you can see there was 11 failed attempts:

pam_tally2 --user root --reset

Wednesday, April 25, 2018

vSphere 6 - SSL Certificates - Overview and Best Practices

As corporate security becomes a higher priority, I just wanted to give a quick rundown on SSL Certificates in vSphere 6 since it has changed drastically from previous versions.

The VMware Certificate Service is part of the Platform Services Controller (PSC)

Key Terms:
VMWare Certificate Authority (VMCA) – Certificate authority for vSphere components only.  A single point of contact for vSphere Certificate needs.  Issues certificates for VMware solution users, machine certificates for machines on which services are running and ESXi host certificates.  Operates in the PSC.  Certificates are managed by the certificate-manager utility. 

VMware Endpoint Certificate Store (VECS) – Serves as a local repository for certificates, private keys and other certificate information.  Runs in vCenter Server Node. 

Types Of Certificates Used by vSphere
  •  Machine Certificates- For Secure connections.  This is what causes the web browser certificate warning if the certificate used is self signed. (ex. vSphere Web Client - vCenter server and external PSC have them)
  • Solution user certificates - authentication of services to vCenter SSO. (ex vcenter service (vpxd))
  •  ESXi certificates – provisioned when the host is added to vCenter. Stored locally on ESXi host.
Certificate Deployment Types:
  • VMCA Default – By default, the VMCA uses a self-signed root certificate.  The VMCA is then the CA for all VMware components.
  • VMCA Enterprise -  The VMCA is used as a subordinate/Intermediate CA and is issued a subordinate CA signing certificate.  It can now issue certificates that trust up to the enterprise CA’s root certificate.  Not accepted by most security groups, since this poses a security risk. 
  • Custom Certificates – The VMCA is bypassed. Need to issue a enterprise/3rd party cert for every component. Must replace each certificate explicitly.  Administrative nightmare! 
  • Hybrid - The VMCA supplies some of the certificates, but also uses custom certificates for other parts of the VMware infrastructure.  As of the time of this writing, this is the RECOMMENDED approach.
Hybrid Deployment Details:  
In a vast majority of environments, the following hybrid deployment is the best fit.  

Trusted Certificates are used for the Machine Certificates of the vCenter server and external PSC.  The management interfaces are using a 3rd party/Corporate trusted CA.  These are the most important certificates and is the only user-exposed certificates.

VMCA certificates are the used for the Solution user and ESXi certificates.

Added bonus, no more "Not Secure" warnings in your browser!

VMware KB regarding replacing machine certificates:

Fantastic VMWare Walkthrough for SSL cert replacement on your vCenter server and External PSC:

Saturday, March 17, 2018

How to mount an ISO to an ESXi Host

I was recently working on and issue in an environment that required me to mount an ISO to an ESXi host.

To access the contents of a CD or ISO within your ESXi Host perform the following:

1. Mount the ISO using iDRAC / iLO etc.
2. Console into the ESXi host and run the following to load iso9660:

vmkload_mod iso9660

3. To find the path to the CD ROM drive run the following:

esxcfg-mpath -l | grep -i cd-rom


4. Run the following to mount the CD-ROM drive:


vsish -e set /vmkModules/iso9660/mount <devicename>


5. You will now be able to see the contents of the CD- Rom in /vmfs/volumes/.  In my case, the ISO I mounted was named "20180215":


6.  Once you're done unmount the CD/ISO with the following:

vsish -e set /vmkModules/iso9660/umount <devicename>

7. To unload the iso9660 module":

vmkload_mod -u iso9660

On a similar note, I've had a lot of success using the following application to create ISOs from files/folders:


VMWare Update Manager - interface com.vmware.vim.binding.integrity.VcIntegrity is not visible from class loader

After logging into the vSphere Web Client, I found the following error in the Update Manager section:

 interface com.vmware.vim.binding.integrity.VcIntegrity is not visible from class loader


I started off by restarting the VMWare vSphere Update Manager Service for the affected vCSA:

1. Log into vCenter using the administrator@vsphere.local account.
2. Home - System Configuration - Services - Restart


This did not resolve my issue...  Unfortunately, I had to resort to something a bit more drastic and disruptive.  Since I did not know which service(s) needed to be restarted I restarted all of them.

SSH/Console into the affected server and run the following commands:

service-control --stop --all
service-control --start --all

This resolved the issue and I was able to see the proper output under the Update Manager tab.

vSphere 6 - Fix - Cannot complete operation due to concurrent modification by another operation.

Add more resources to a VM, not a problem right?  Well, not this time.  When attempting to add memory to a VM, I received the following error:

"Cannot complete operation due to concurrent modification by another operation."


I confirmed there were no other operations/modifications occurring on the VM at the same time.  In the past, I would just SSH/Console into the vCSA and restart the services with the following commands.  (Warning - This process is disruptive):

service-control --stop –all
service-control –start –all

In this case, the services restart did not resolve the issue.  On a whim, I created and deleted a snapshot on the VM.  This action "freed" up the VM and allowed me to add the additional resources.


In the future, I'm going start off with the "snapshot" route since it's less disruptive.

Hope this helps!

Friday, March 16, 2018

"RDP Inception"

That's when you have to RDP into one box to get to another box.  That is all...